Planning Missions
Flight plans are generated in the Mission Planner’s PLAN menu from the toolbar. This screen can be divided into three blocks:
-
Mission Canvas:
A map that serves as a support to define the events and to define the type of layout to be carried out (MISSION, FENCE, RALLY). -
Right Menu:
Allows you to select the map source for the Canvas, save or load the mission on the computer, read or write the mission in the autopilot, and set the Home position. -
Lower Menu:
Allows you to view the list of flight plan events, define event types, reorder events, and modify event parameters.
Highlighted Features:
- Mission Canvas: A key element where all the event planning happens.
- Right Menu: Provides essential controls for saving, loading, and managing the mission data.
- Lower Menu: The heart of event management for your mission.
The Mission Canvas allows you to define the layout types, including MISSION, FENCE, and RALLY, which are crucial for flight planning.
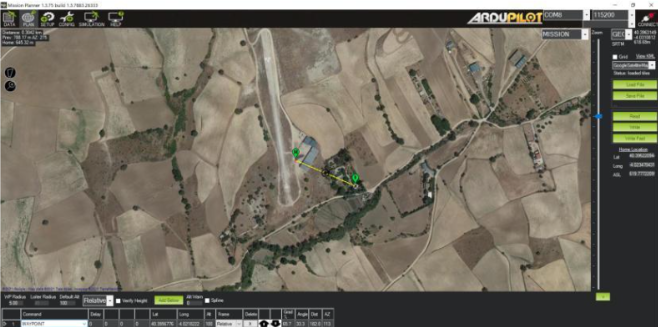
Figure 27. Planning Missions
Maximum attainable altitude
While the drone is connected to the Ground Control Station, you can go to Settings tab, and then set the Maximum Attainable Altitude. Hereafter, the drone won’t never overpass this altitude set for any of the available flight modes.
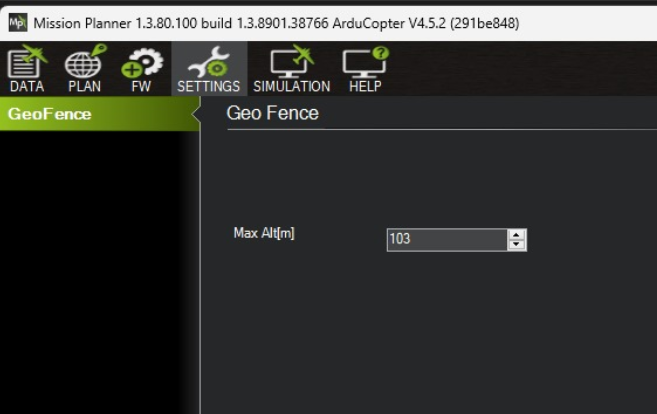
Figure 28. Maximum attainable altitude
Generic Flight Plan Generation
Next, the step by step procedure to generate a Generic Flight Plan is described. Make sure the MISSION option is selected in the dropdown menu in the upper right corner.
1. Add Event
Events are added by left clicking anywhere on the Mission Canvas. Created events can be re-positioned by dragging them while keeping the left mouse button pressed on it. To delete an event, right click on it, and click on the Delete WP option.
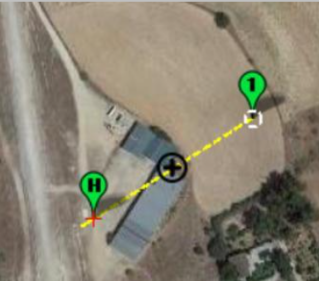
Figure 29. Add Event
2. Define Event
Every time an event is created on the Mission Canvas, they are listed in the bottom menu. From here one can define the type of event by clicking on the dropdown menu (TAKEOFF, WAYPOINT, etc). Once the event type is selected, the parameters can be defined by entering numbers in the boxes. Next it is described the most common events:
| EVENT | DESCRIPTION |
|---|---|
| TAKE OFF | Commands the Drone to climb to the height indicated in the Alt box once the flight mode is changed to AUTO. |
| DO_CHANGE_SPEED | Orders the Drone to adopt the speed indicated in the speed m/s box. |
| CONDITION_YAW | Commands the Drone to maintain orientation in the XY plane indicated in the Deg box. |
| WAYPOINT | Orders the Drone to move to the coordinate point indicated in the Lat, Long, Alt boxes, and to remain there for a time determined by the delay box. |
| DO_SET_CAM_TRIGG_DIST | Orders the Drone to start taking a photo every certain interval of space indicated in the Dist (m) box. |
| RETURN_TO_LAUNCH | It orders the Drone to return to the launch point, which it will do at the same speed and height with which it reached the last waypoint. |
That depending on the type of event, the meaning of the boxes change: in WAYPOINT type events the first box is the Delay, while for DO_SET_CAM_TRIGG_DIST events the first box is the Dist (m).

Figure 30. Define Event
3. Interpretation of the Heights
All events have one box, Alt, which defines the altitude at which the event is executed. This box is very important for TAKEOFF and WAYPOINT event types, since they indicate the height to which the Drone will take off or the height at which the corresponding waypoint is located.
In the heights dropdown menu, there are three options to define how the value in the event's Alt box will be interpreted:
-
Relative: Heights are relative to the HOME position.
-
Absolute: Heights are absolute with respect to sea level.
-
Terrain: Heights are relative to the point on the terrain where the waypoint is located.
For the drone HERCULES X8, given its size, the minimum commanded WAYPOINT altitude should be greater than 2m.

Figure 31. Interpretation of the Heights
4. Verify the Flight Plan
Once all the events that make up a mission have been added and defined, it is convenient to verify that the resulting flight plan represents what the operator expects of it. In this sense, it is recommended to verify the following:
- The order of the events is as expected (in case it is necessary to change, use the arrows in the definition line of each event)
- The position of the WAYPOINT type events is correct (in case it is necessary to change, drag the waypoints on the mission canvas)
- Verify that the type of height interpretation is correct (in most cases it would be relative heights)
- Verify that the numbers entered in the Alt box are the desired ones for each event

Figure 32. Verify the Flight Plan
5. Save the Flight Plan
Once you are satisfied with the flight plan, follow these steps to save and load it:
-
Save the Flight Plan: Click the SAVE FILE button on the Right Menu to save the flight plan in your computer's memory.
-
Load the Flight Plan: To load the saved plan into Mission Planner, click the LOAD FILE button at any time.
-
Send to Drone: Once the Mission Planner is connected to the Drone, click the WRITE button to send the flight plan to the Drone's autopilot.
Verify that the mission has been loaded into the Drone's autopilot, click the READ button. This will load the plan from the Drone's memory into Mission Planner.
Key Points
- The SAVE FILE, LOAD FILE, WRITE, and READ buttons are essential for managing the flight plan.
Ensure that Mission Planner is connected to the Drone for sending and verifying the plan.
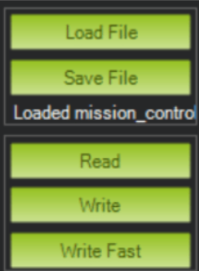
Figure 33. Key Ponts
Generation of Flight Plan for Mapping
Next, the step by step to generate a Flight Plan for Mapping type missions is described. Make sure the MISSION option is selected in the dropdown menu in the upper right corner.
1. Create Polygon
Right click on the canvas and then click on Draw Polygon / Add Polygon Point. After this, the cursor goes into polygon mode, and each left- click on the map will add a new polygon point. Create as many points as necessary and move them on the map to enclose the area of interest. The other options offered by the Draw menu are described below.
- Clear Polygon: clear the polygon from the screen
- Save Polygon: Save the polygon to your hard drive in . poly
- Load Polygon: Load a polygon from the hard drive in . poly
- From SHP: Load a polygon from the hard drive in . shp
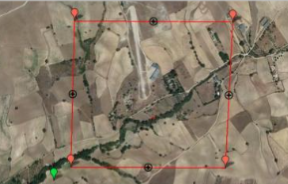
Figure 34. Create Polygon
2. Grid Layout – Flight Parameters
Once you have a defined polygon, access the grid menu by right-clicking on the screen and then clicking on Auto WP / Survey (Grid). After this, a new screen opens with the options to define the mission grid. The mission planner must ensure that the five most important flight parameters are defined:
-
Camera:
- In the Simple tab, choose the type of camera to be used in the mission.
- In the Camera Config tab, ensure the correct Focal Length (mm) is indicated.
-
Altitude:
- In the Simple tab, under Altitude (m), indicate the flight height.
-
Speed:
- In the Simple tab, under Flying option Speed (est) (m/s), indicate the flight speed.
- Make sure the Use Speed option for This Mission is selected at the end of the grid drawing process.
-
Overlap:
- In the Grid tab, under Options Overlap (%), indicate the desired percentage of longitudinal overlap between photos.
-
Sidelap:
- In the Grid tab, under Options Sidelap (%), indicate the desired percentage of lateral overlap between photos.
Additional Recommendations:
In addition to defining the five flight parameters, the following recommendations should be taken into account:
-
Save Camera and Focal Length: If you plan to repeat the camera and focal length combination in future flights, go to the Camera Config tab and use the Save option.
-
Save the Grid: To modify the defined grid later, press Ctrl+S to save and choose a location. To upload it later, press Ctrl+O and select the saved file.
-
Start Near Takeoff: It is recommended that the first waypoint of the mission be located near the takeoff site. You can control the position of this waypoint in the Grid tab under Options StartFrom.
-
Maintain Orientation: Ensure the drone maintains the same orientation in the XY plane throughout the mission. This avoids turns on its axis every time it reaches a waypoint. To do this, make sure the Heading Grid Tab Hold Options is selected.
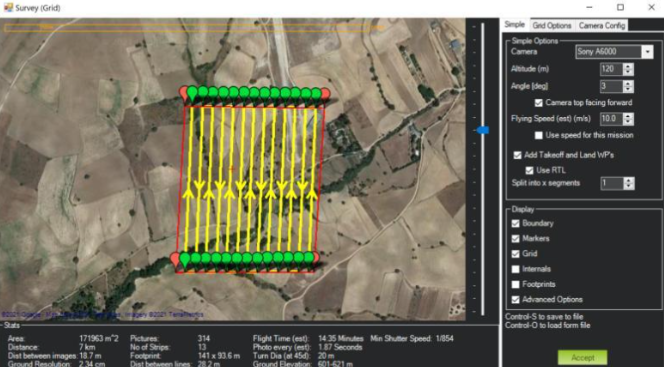
Figure 35. Grid Layout – Flight Parameters
3. Grid Validation – Mission Parameters
Before proceeding, once the 5 flight parameters mentioned above are defined, it is crucial to evaluate how they affect the 3 key mission parameters:
- Resolution (cm/pixel)
- Flight Time (min)
- Time Between Photos (sec)
These values can be found in the box located below the grid map. To determine if a flight parameter set is valid for a mission, specific criteria based on the mission parameters must be defined.
A mission is considered well-designed if the 5 flight parameters are chosen in such a way that the criteria based on the 3 key mission parameters are met.
Key Mission Parameters:
-
Resolution:
- Affected by the Camera and Height parameters.
- Limited by the expected quality of the cartographic product.
-
Flight Time:
- Affected by the Height, Speed, and Sidelap parameters.
- Limited by the drone's ability to fly at a certain height with a given payload.
-
Time Between Photos:
- Affected by the Velocity and Overlap parameters.
- Limited by the camera’s ability to capture two photos consecutively.

Figure 36. Grid Validation – Mission Parameters
4. Generate the Flight Plan
Once the 5 flight parameters have been selected and it has been verified that the 3 mission parameters meet their specific selection criteria, follow these steps:
- Click the Accept button to exit the Survey menu (Grid).
- Return to the Flight Plan tab.
Once you're back in the Flight Plan tab:
- At the top, you will see the waypoints of the mission on the canvas.
- At the bottom, you will see the list of events that the drone will execute in an orderly manner.
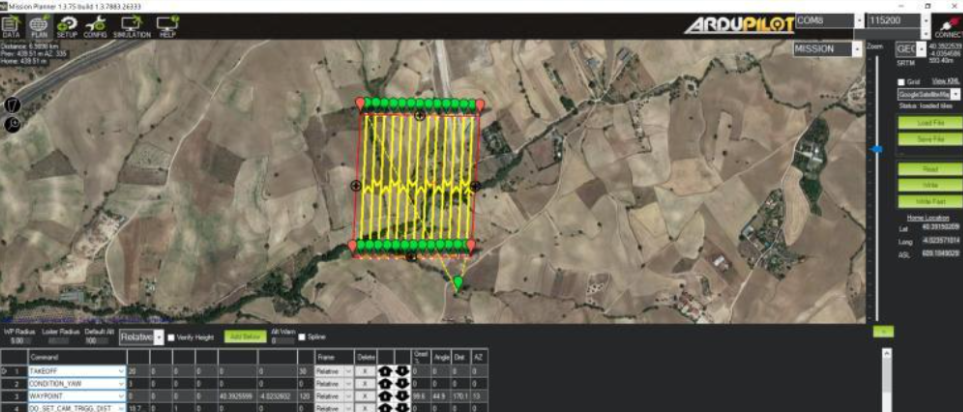
Figure 37. Generate the Flight Plan